.jpg)
Programming allows you to update and reprogram ECMs based on part numbers . You can access the following Programming selections by selecting Programming from the TOC:
When Programming, please follow the appropriate connection set-up in the diagram below.
Note:
There are different connection methods depending on Diagnostic use or Reflash use for E-IDSS. In addition, there are connection methods for 24V system use and 12V system use. Please use the correct connection method dependent on usage.
Select the voltage which is appropriate for the voltage specified in the ECM specifications.
In order to protect the ECM and the IDSS Interface Device, when connecting the device, connect the power source last. When disconnecting the IDSS Device, disconnect the power source first.

Programming can also be accessed by selecting the Reflash Icon from the IDSS tool bar:
![]() <-- (Reflash Icon)
<-- (Reflash Icon)
To avoid programming failures, you should first clear all Diagnostic Trouble Codes in Diagnostic Mode before proceeding with a Programming event.
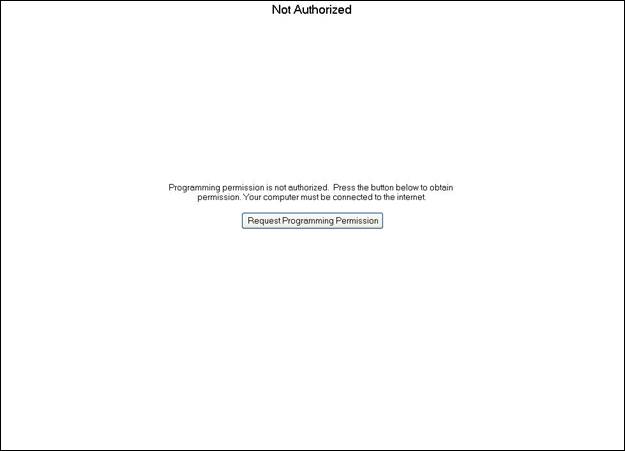
In order to access Programming your dealership will need to have permission from Isuzu Motors. If you have not been granted permission, you may request it by selecting the “Request Programming Permission” button. Please perform programming permission on a periodic basis.
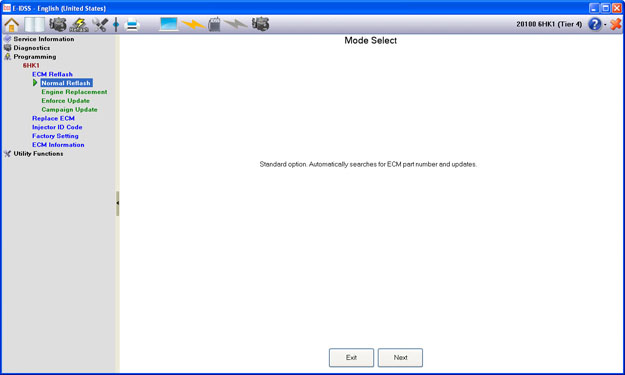
Each Reflash Mode will now be explained.
Select this for normal situations. The current ECM Part Number is read from the connected ECM and it is possible to program (reflash) with the automatically searched latest compatible part number.


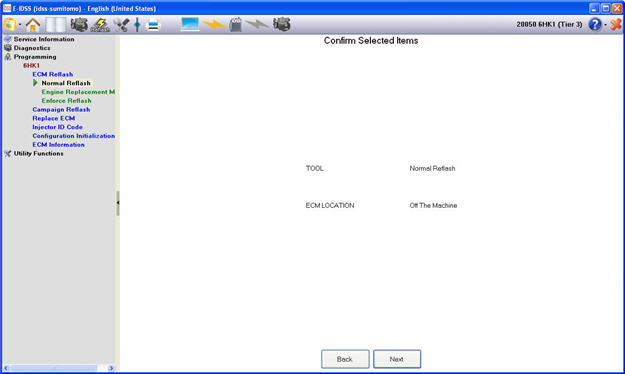
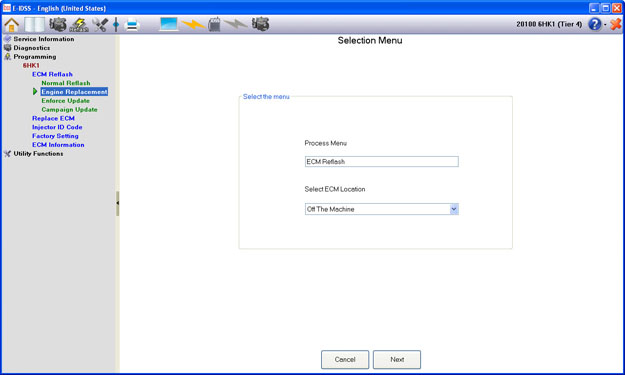
Select the ECM Condition:
• On the machine: When the ECM is part of the machine.
• Off the machine: When the ECM is not part of the machine; for example, on a desk.
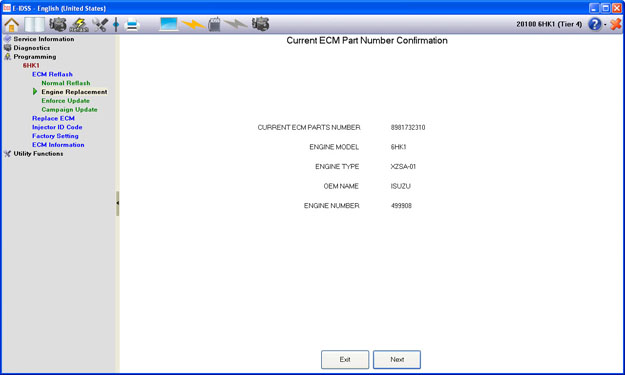
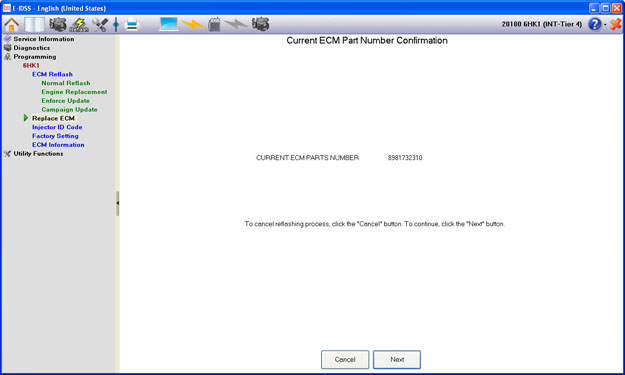
Current ECM Part Number Confirmation
Next, confirm that the currently displayed ECM Part Number is correct.
Note: You may return to the previous screen or cancel the reflash process at any time by selecting the “Back” or “Cancel” buttons.
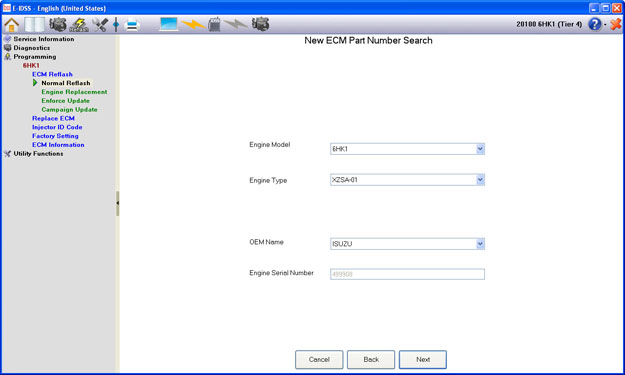
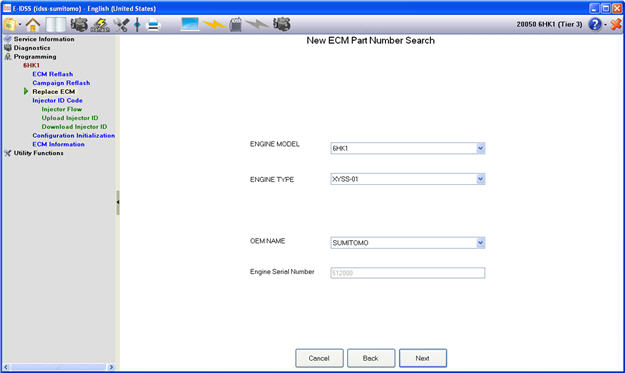
New ECM Part Number Search
Information is selected in order to search for the compatibility information for the ECM that will be reflashed. The information to be selected is as follows: Engine Model, Engine Type, OEM Name, Engine Serial Number.
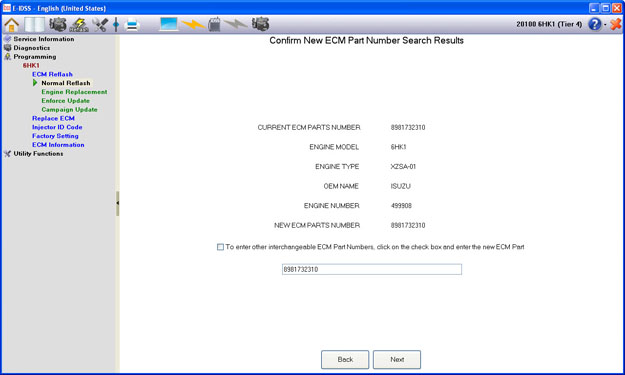
Confirm New ECM Part Number
The new ECM Part Number will automatically be displayed from the current ECM Part Number information. When this is the new target ECM Part Number, please confirm that this information is correct by selecting the “Next” button, or select the check box and enter another interchangeable ECM Part Number.
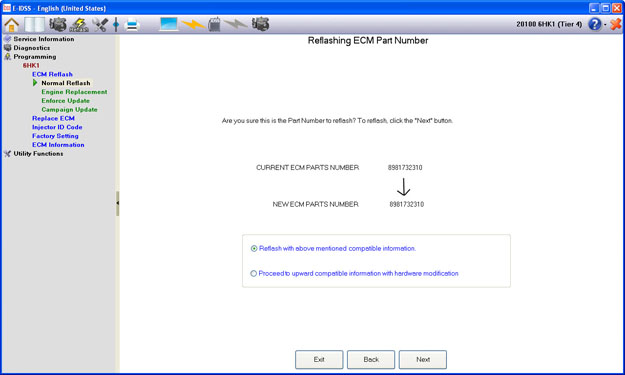
ECM Part Number Reflash Confirmation
Before reflashing, you will be asked to confirm the Part Number to be programmed. If the displayed Part Number is incorrect, select the “Back” button to return to the previous screen or the “Exit” button to return to the main menu. Check the new ECM Part Number that is to be reflashed. If the displayed New Part Number is correct, select “Reflash with upward compatible information.” and press the “Next” button. When performing reflash to an upward compatible part number with accompanying hardware modification, select “Proceed to upward compatible with accompanying hardware modification.” If the displayed Part Number is correct, first choose if you would like to reflash with the displayed criteria or proceed to upward compatible information with hardware modification. Then select the “Next” button.
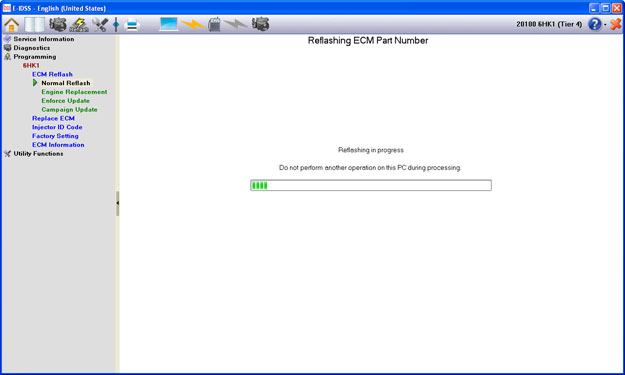
A pop-up notification will appear displaying the available file name that the new ECM part number will be reflashed with. To begin programming, select the “OK” button for reflash to begin. Select the “Cancel” button to not perform the reflash.
*Please do not perform any other operation on the same computer while reflash is in progress as this may cause a reflash error.

Reflash Processing
During programming, the following two progress bars will be displayed:
Reflash progress display.
Verification (Re-confirmation of the ECM reflash status)
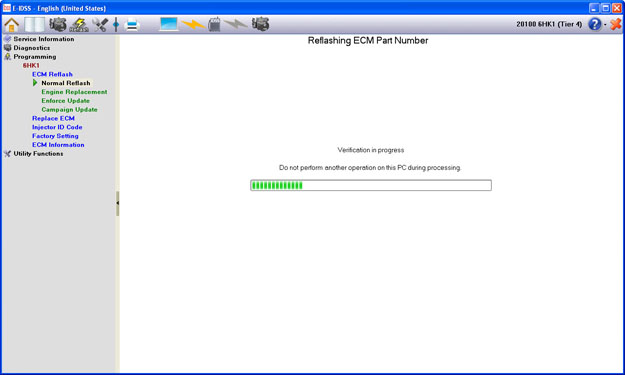
Note: It is important to not perform any other operations on the PC during this time.
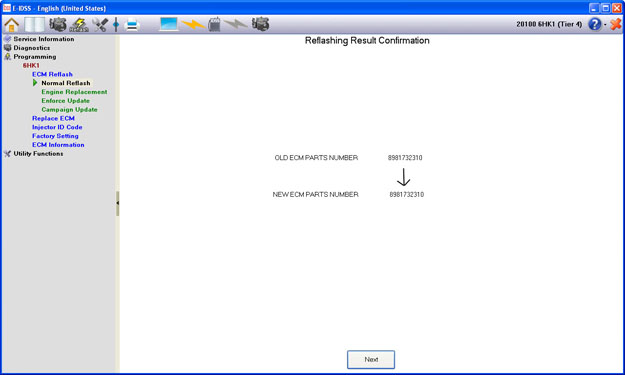
Reflash Result Confirmation
After Reflash is complete, both the Old ECM Part Number and the New ECM Part Number will be displayed. Please confirm that the new Part Number is correct and then select the “Next” button.
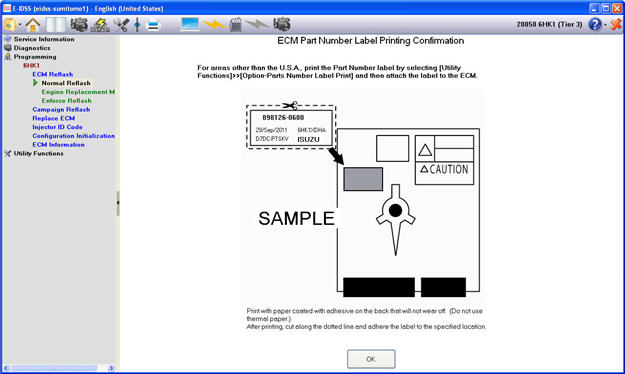
ECM Part Number Label Print Confirmation
After the total reflash operation has completed, it is necessary to attach the new ECM Part Number Label to the ECM. That procedure will be displayed on the screen.
*The actual printing process will not be performed here.
Result Confirmation
The following screen displays information about the new ECM calibration. Included are: Part Number, Engine Model, Engine Type, and OEM Name.
After completing the reflash process, the new (current) ECM Part Number information will be displayed. Press the “OK” button to exit.
Note: After connecting the reflashed ECM to the machine, make sure to perform DTC memory clear (erase diagnostic trouble codes).

This is used when returning to an older type of part number for an accompanying hardware change. Please be sure to check the information from the machine manufacturer.
In Engine Replacement Mode, it is possible to create an ECM with an old ECM Part Number specification. This mode is primarily used when replacing the engine in order to reprogram the new ECM specification into an older specification requirement so that the correct ECM specification can be used on the machine.


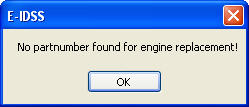
If a Part Number cannot be found for the engine replacement you will receive the following pop-up message:
Please proceed with programming by following the on-screen instructions.
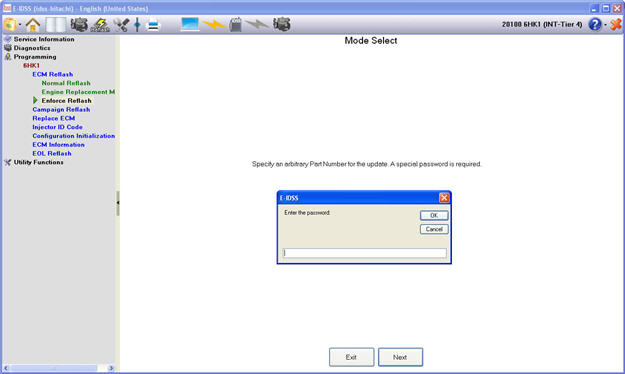
Update with any designated part number. A separate, special password is required for this.
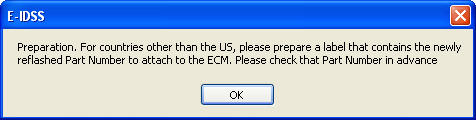
Preparation
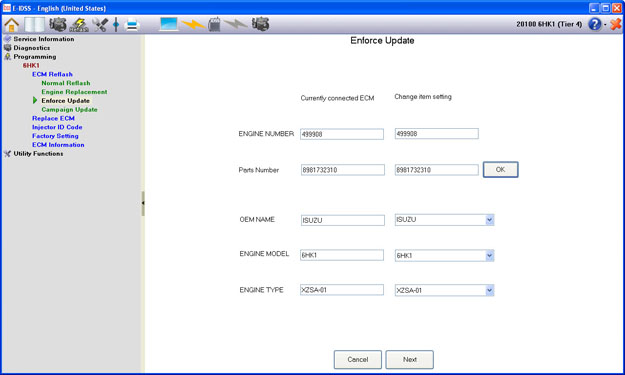
Enforce Update allows you to specify an arbitrary Part Number for an update. However, a special password is needed in order to access this function. Before proceeding, be advised to prepare a label for the new Part Number to attach to the ECM. Also, please check the new Part Number in advance.
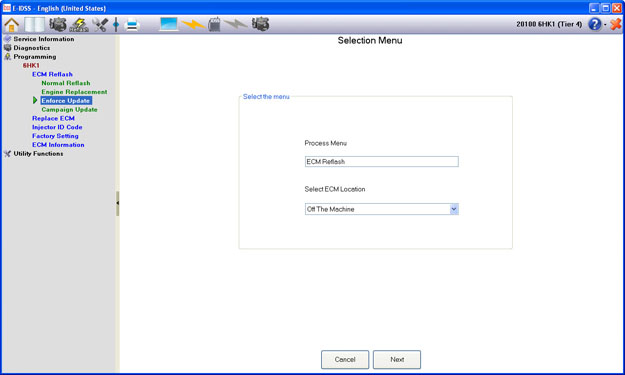
Selection Menu
Select the ECM Condition:
• On the machine: When the ECM is part of the machine.
• Off the machine: When the ECM is not part of the machine; for example, on a desk.

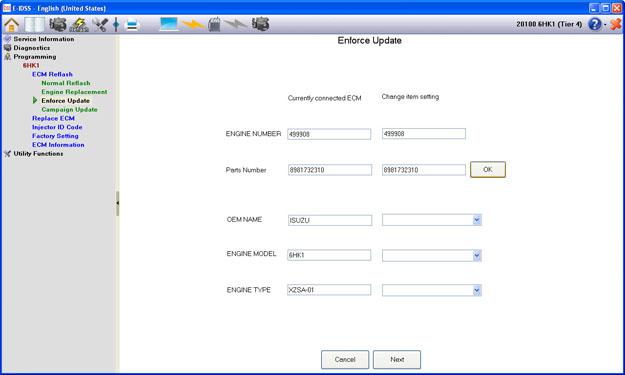
For the Enforce Reflash mode, the current ECM Part Number information will be displayed on the left side of the screen and the Part Number information for the ECM you want to create can be input on the right side of the screen.
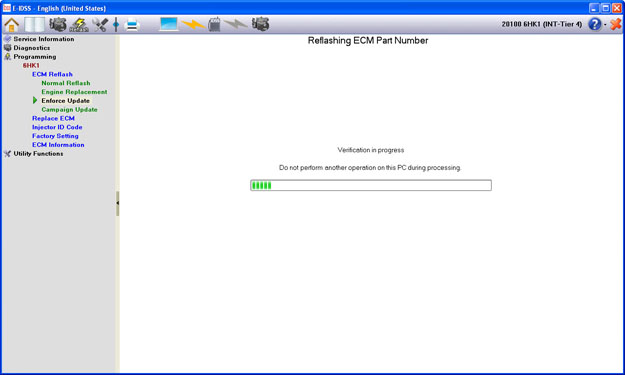
Reflashing ECM Part Number
Before reflashing, you will be asked to confirm the Part Number to be programmed. If the displayed Part Number is incorrect, select the “Back” button to return to the previous screen or the “Exit” button to return to the main menu. Check the new ECM Part Number that is to be reflashed. If the displayed New Part Number is correct, select the “Reflash with upward compatible information.” box and press the “Next” button. When performing reflash with an upward compatible part number with accompanying hardware modification, select “Proceed to upward compatible with accompanying hardware modification.” If the displayed Part Number is correct, first choose if you would like to reflash to the displayed criteria or proceed to upward compatible information with hardware modification. Then, select the “Next” button.
A pop-up notification will appear displaying the available file name that the new ECM part number will be reflashed with. To begin programming, select the “OK” button for reflash to begin. Select the “Cancel” button to not perform the reflash.
*Please do not perform any other operation on the same computer while reflash is in progress as this may cause a reflash error.
Reflashing Result Confirmation
After Reflash is complete, both the Old ECM Part Number and the New ECM Part Number will be displayed. Please confirm that the new Part Number is correct and then select the “Next” button.
ECM Part Number Label Print Confirmation
After the total reflash operation has completed, it is necessary to attach the new ECM Part Number Label to the ECM. That procedure will be displayed on the screen.
*The actual printing process will not be performed here.
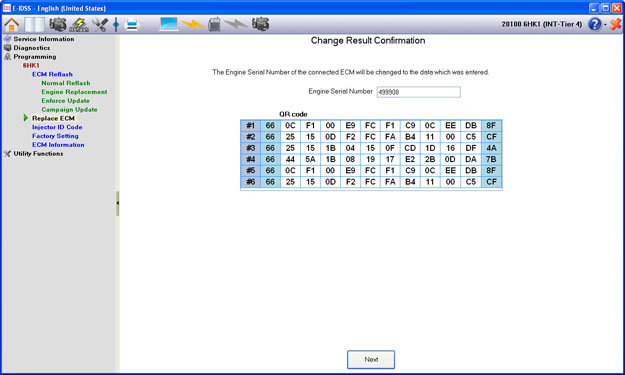
The following screen will request confirmation of the Engine Serial Number to be programmed. Please confirm that the displayed Engine Serial Number is correct and then select the “Next” button.

Result Confirmation
The following screen displays information about the new ECM calibration. Included are: Part Number, Engine Model, Engine Type, and OEM Name. After completing the reflash process, the new (current) ECM Part Number information will be displayed. Press the “OK” button to exit.
Note: After connecting the reflashed ECM to the machine, make sure to perform DTC memory clear (erase diagnostic trouble codes).

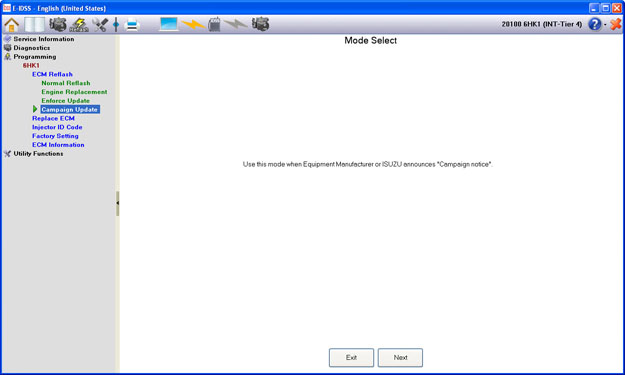
The Campaign Update function is used when a “Campaign Notice” is announced by ISUZU. Select the “Next” button to proceed to the next screen, or select the “Exit” button to return to the ECM Reflash main menu.
If no campaigns are available, the following pop-up will appear:

Select the “OK” button to return to the ECM Reflash main menu.
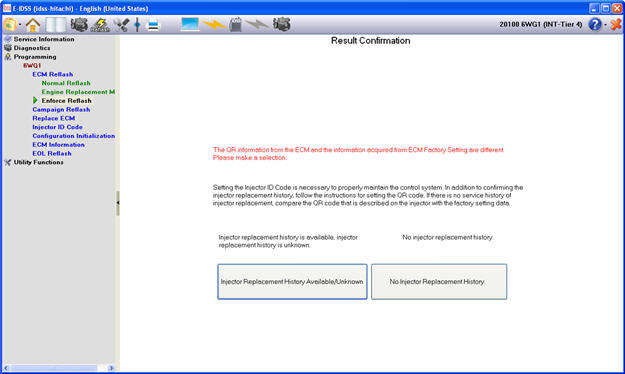
Injector ID Code
The Injector ID Code for factory setting can be selected or the user can manually input the Injector ID Code setting. When using the Injector ID Code from the factory setting, select “No Injector Replacement History.” When changing the Injector ID Code, select “Injector Replacement History Available/Unknown.”
Before downloading factory settings, first confirm that the values are correct, then click the “Download" or "Next" button.
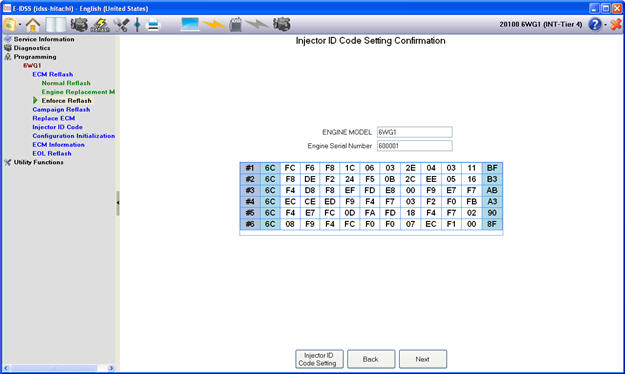
After downloading is complete, the new Injector ID will be displayed. Confirm that these settings are correct and then select the “Next” button to exit Reflash.
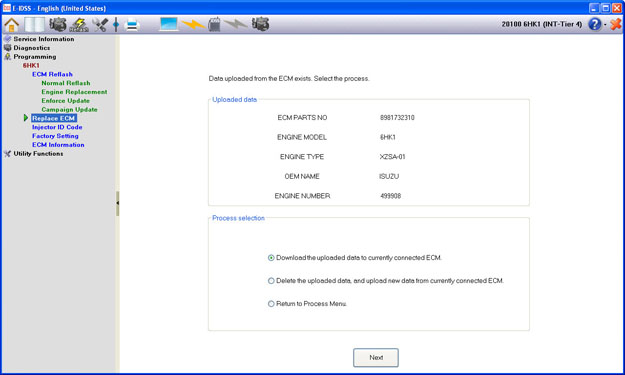
The Replace ECM function allows you to upload information from an ECM and then download the information to a newly replaced ECM.
Select Process
If uploaded data from the past already exists you will need to confirm whether to download this data to the currently connected ECM or delete this data and proceed to upload new data from the currently connected ECM.
Selection Menu
Select the ECM Condition:
• On the machine: When the ECM is part of the machine.
• Off the machine: When the ECM is not part of the machine; for example, on a desk.


Select the ECM condition:

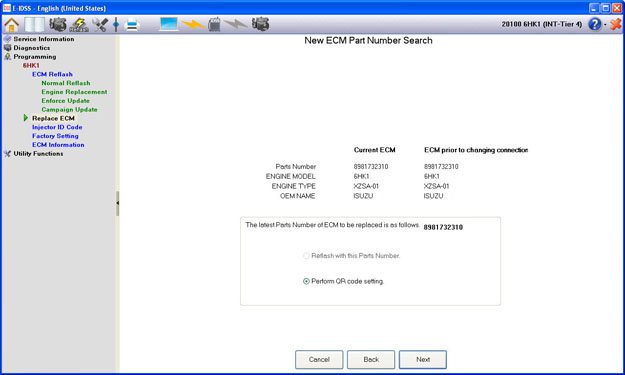
New ECM Part Number Search
Before reflashing, you will be asked to confirm the Part Number to be programmed. If the displayed Part Number is incorrect, select the “Back” button to return to the previous screen or the “Exit” button to return to the main menu. Check the new ECM Part Number that is to be reflashed. If the displayed New Part Number is correct, select “Reflash with upward compatible information.” and press the “Next” button. When performing reflash to an upward compatible part number with accompanying hardware modification, select “Proceed to upward compatible with accompanying hardware modification.” If the displayed Part Number is correct, first choose if you would like to reflash with the displayed criteria or proceed to upward compatible information with hardware modification. Then select the “Next” button.
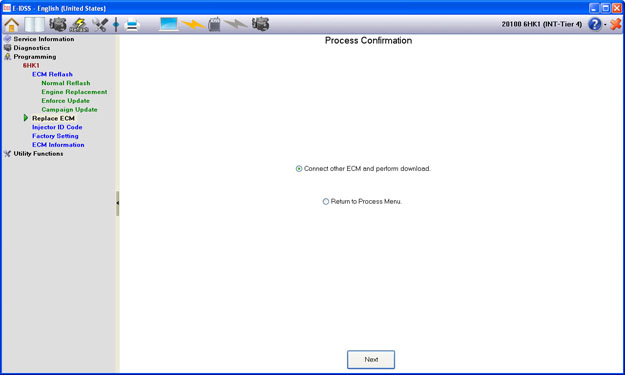
Process Confirmation
Please connect the new ECM to be programmed and select the “Next” button. If for any reason you would like to cancel this process, select “Return to Process Menu.”
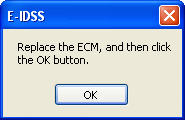
After disconnecting the power supply to the ECM, replace with the new ECM.
If the ECM has not yet been replaced, the following pop-up will appear:
Please confirm the information for the Current ECM and ECM prior to changing the connection . After data is downloaded, you will transition to the ID code setting.
After the Injector ID code setting is performed, the current Injector ID data will be displayed. Select the “Next” button to exit Replace ECM and return to the Programming main menu.
The Injector ID Code function is used to reprogram Injector ID Code after fuel injectors have been replaced.
You can modify the Injector ID Code using the following methods:
• Modify by Injector View
• Modify by Valve Cover View
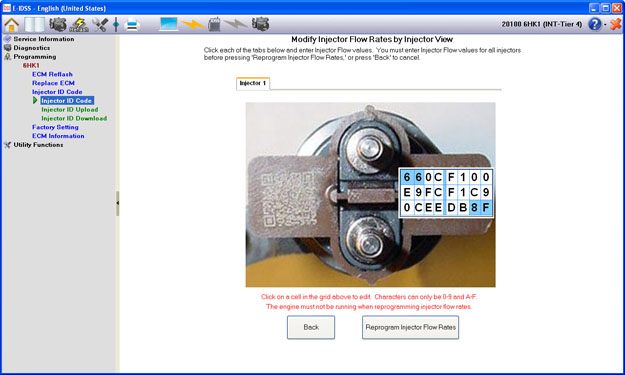
Modify by Injector View
To modify by injector view:
1. Choose "Modify by Injector View."
2. Select the injectors to program.
3. Click the Next button.
4. The current values for each injector you selected to program will display on a tab.
5. Select the tabs to modify the values.
6. Type the new values in the edit boxes and click the Reprogram Injector Injector ID Code button.
7. If there are any incorrect values entered, IDSS will prompt you to correct the problem.
NOTE: The engine must not be running when fuel injectors are programmed.
8. Once correct values are accepted, follow the on screen instructions to program the Injector ID Code.
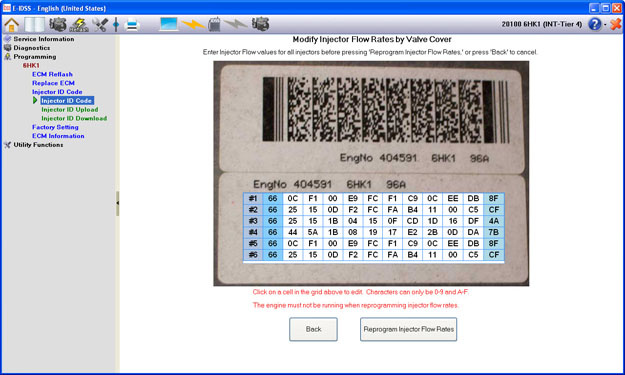
Modify by Valve Cover View
To modify by valve cover view:
1. Choose “Modify by Valve Cover View.” You do not have to select injectors to program.
2. Click the Next button.
3. The current values for all injectors will display.
4. Type the new values in the edit boxes and click the Reprogram Injector ID Code button.
5. If there are any incorrect values entered, IDSS will prompt you to correct the problem.
NOTE: The engine must not be running when fuel injectors are programmed.
6. Once correct values are accepted, follow the on screen instructions to program the Injector ID Code.
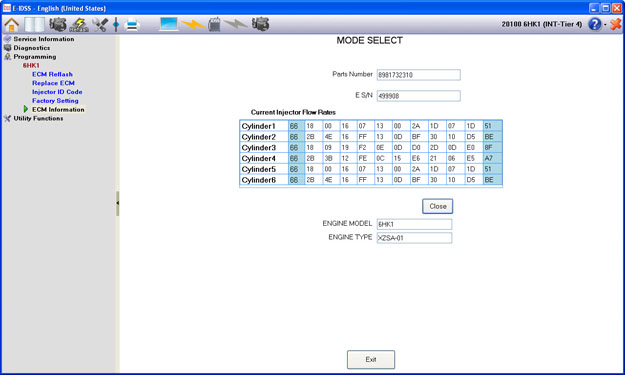
The Factory Setting function allows you to view and download the original QR code from an ECM at any time.
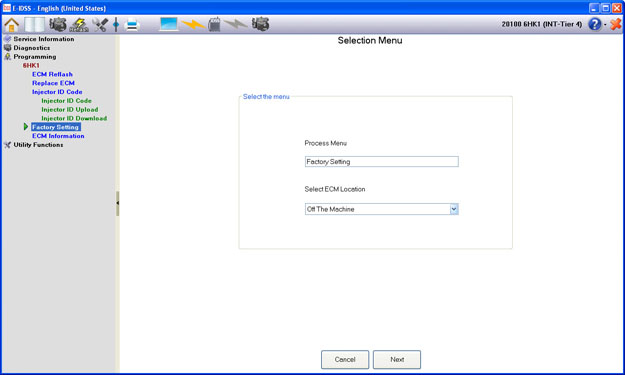
Selection Menu
Select the ECM Condition:
• On the machine: When the ECM is part of the machine.
• Off the machine: When the ECM is not part of the machine; for example, on a desk.

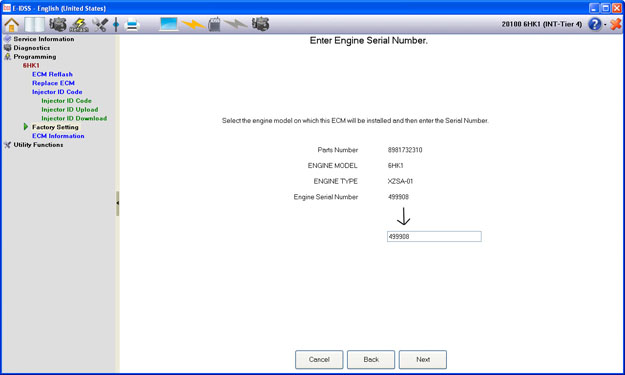
Enter Engine Serial Number
Information is selected in order to search for the compatibility information for the ECM that will be reflashed. The information to be selected is as follows: Engine Model, Engine Type, OEM Name, Engine Serial Number.
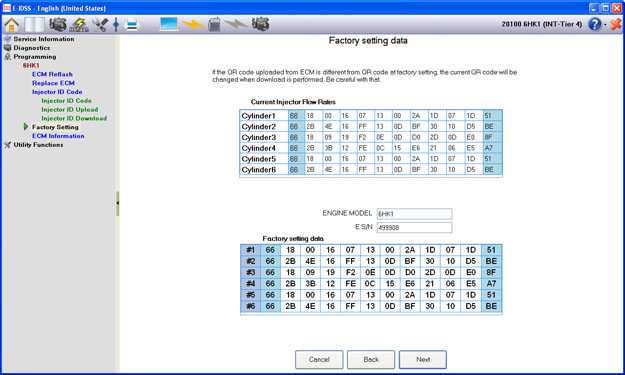
Factory Setting Data
This screen displays the currently uploaded Injector Flow Rates along with the Factory Setting Data for the specified ECM. If you wish to program these Factory Settings, select the “Next” button. If you are not sure, please press the “Back” or “Cancel” button.
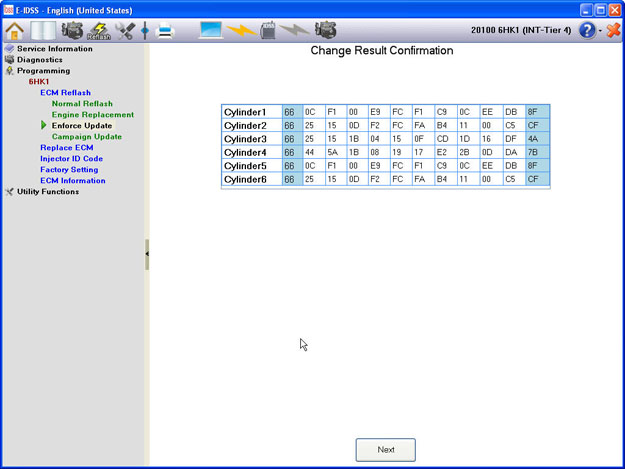
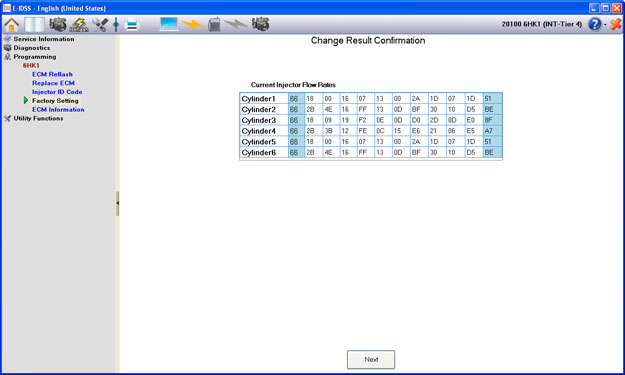
Change Result Confirmation
After programming, this screen will display the downloaded Factory Setting Data. Select the “Next” button to return to the Programming Main Menu.
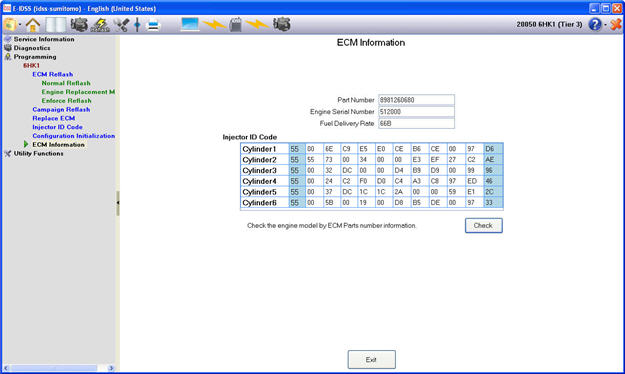
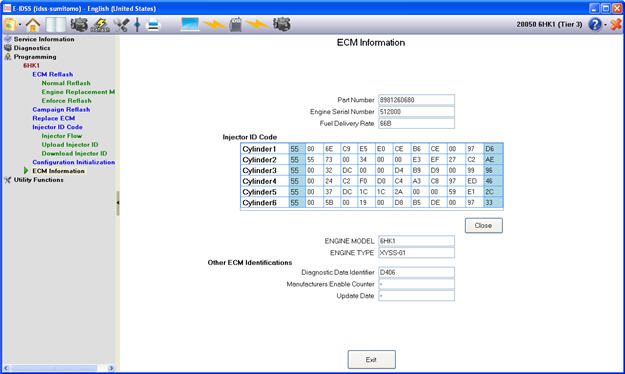
The ECM Information function allows you to use the current ECM Part Number to check the Engine Model and Engine Type that is specified.
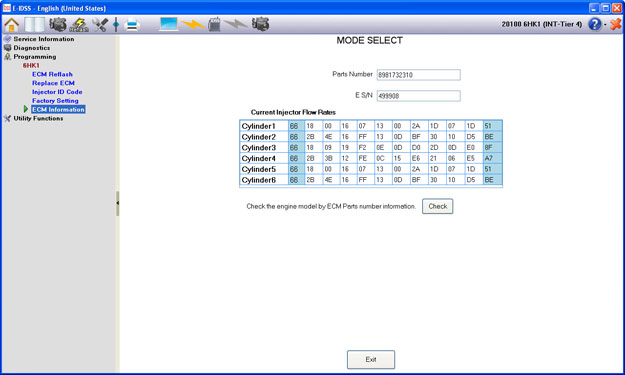
Select the “Check” button to generate the current Engine Model and Engine Type for the current ECM Part Number. When finished, select the “Exit” button to return to the Programming Main Menu.